This store requires javascript to be enabled for some features to work correctly.

Yoga for Relaxation and Restoration: Finding Balance with Jen McGregor Yoga

Yoga for Relaxation and Restoration: Finding Balance with Jen McGregor Yoga

In today's busy world, everyone needs a moment of calm and a chance to reset. Yoga offers that space for relaxation and restoration. At Amp...

In today's busy world, everyone needs a moment of calm and a chance to reset. Yoga offers that space for relaxation and restoration. At Amp Wellbeing, we emphasize the importance of making yoga a regular part of your routine to maintain both physical and mental balance. Whether you're a beginner or experienced, slowing down through yoga can provide as much benefit as an intense workout, helping your body and mind to rest and rejuvenate. Try these relaxing moves from Jen McGregor Yoga to get started.

Why Add Yoga to Your Routine?

Yoga offers a gentle way to stretch, strengthen, and connect with your breath. Regular practice helps reduce stress, improve flexibility, and bring balance to your body and mind. Adding yoga to your weekly routine acts like a reset, helping you handle life with more ease.


A Restorative Yoga Routine for Balance
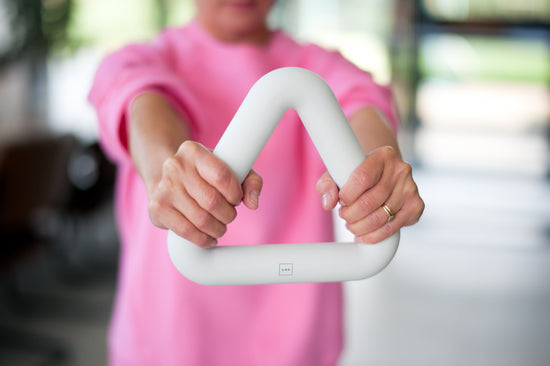
Below is a restorative yoga routine from Jen McGregor Yoga, designed to help you unwind and recharge. It’s perfect for evenings or anytime you need to reset, allowing you to slow down and experience the peaceful side of yoga.
 Jen suggests using a Yoga Wheel for extra support during your stretches.


childs pose yoga on leopard print yoga mat home workout fitness and wellbeing


1. Child’s Pose (Balasana)

How to do it: Kneel on your mat, bring your big toes together, and sit back on your heels. Extend your arms forward and rest your forehead on the mat.

Why we love it: This pose calms the body and eases tension in your back, hips, and shoulders.

Tip: Use a Yoga Block under your chest or forehead for support.


2. Cat-Cow Stretch (Chakravakasana)

How to do it: Start on all fours, alternating between arching your back (Cow) and rounding your spine (Cat) as you breathe.

Why we love it: This movement releases tension along the spine and improves flexibility in the back and neck.


3. Assisted Fish Pose (Matsyasana) Using a Yoga Wheel

How to do it: Start seated with your legs extended. Place the Yoga Wheel behind your back and slowly lean onto it, letting it support your spine.

Why we love it: The yoga wheel supports a backbend, helping open your chest, shoulders, and throat for deep relaxation.

Tip: For deeper relaxation, light candles and practice this pose in the evening.


@jen.mcgregor.yoga

4. Butterfly Legs with Yoga Wheel

How to do it: From Assisted Fish Pose, bring the soles of your feet together in a butterfly shape while the Yoga Wheel supports your spine.
 Rest your arms at your sides.

Why we love it: This pose stretches your inner thighs and hips while maintaining support for your spine and chest. It's perfect for unwinding.


5. Legs Up the Wall (Viparita Karani) or using the Yoga Wheel

How to do it: Lie down and scoot your hips to a wall.
 Extend your legs vertically up the wall. Alternatively, use the Yoga Wheel for support as you raise your legs.

Why we love it: This pose promotes circulation and relaxation, calming the nervous system and reducing leg tension.


Finding Balance
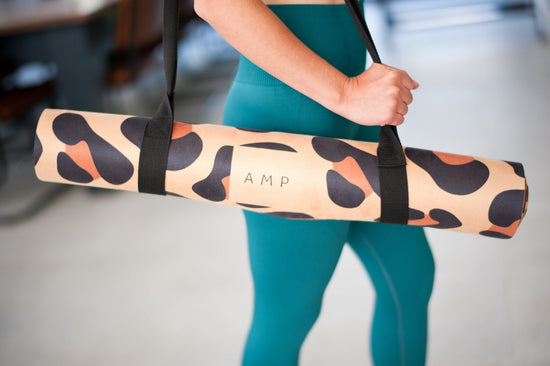
Incorporating restorative yoga into your weekly routine helps bring balance to your life.
 Whether you're practicing in the morning or unwinding in the evening with the support of a yoga wheel, these moments of stillness reconnect you with yourself. Roll out your mat, relax into the calming energy of yoga, and let your breath guide you into deep relaxation. Enjoy the gentle, velvet soft textures of our vegan suede mats to practice on.

Find out more about Jen McGregor Yoga here or follow Jen on Instagram @jen.mcgregor.yoga for more yoga tips, inspiration and challenges!

We'd love to know how you get on and how you feel after practicing these moves.

Revitalise and Recover: A Stretching and Foam Roller Session for Home Workouts

Revitalise and Recover: A Stretching and Foam Roller Session for Home Workouts

Enhancing your fitness journey is not only about the exercise, workouts and energy that you put into your sessions. It is also about how you...

Enhancing your fitness journey is not only about the exercise, workouts and energy that you put into your sessions. It is also about how you then rest, recover and optimise the health of your body to be able to make the most out of your workouts. The purpose of this is to improve the quality of the effort you do put in, to raise your overall performance for optimum health. Working hard without looking after yourself and implementing recovery techniques may hinder instead of enhance, your fitness journey. We are going to look at how to do this effectively, by looking at the value of incorporating foam rolling into your exercise routine.

What is foam rolling?

Foam rolling is a self-myofascial release (SMR) technique. It is an effective tool to add to your warm-up or cooldown, to use before and after exercise. The benefits of foam rolling can vary from person to person but it can help to relieve muscle tightness, soreness, and inflammation as well as increase your joint range of motion and improve your posture, all beneficial outcomes to maintaining and improving your current health and fitness levels. Through this self-massage technique, you can help to release built up tightness from overuse, weakness and repetitive movements. It has become a staple in gyms, health and wellbeing centre's and with physios.


foam rollers how to guide


The Benefits of Foam Rolling

It has been recently reported that muscle strains and tightness can limit life activities as well as reduce your exercise time or number of sessions when you are still sore from the previous workout. This is increasingly prevalent in young adults and more common in women, often associated with pain. However, taking action to mitigate this tension, such as through foam rolling, can have positive impacts on your workout performance, and also your every day life. Lets looks at some of the benefits of including foam rolling into your weekly routine.

 1. Convenient

Foam-rolling is a convenient and budget friendly option for recovery, with one piece of small equipment, the foam roller, you can enjoy the self-massage techniques, releasing tension and soreness from the comfort of your own home and in your own time.

2. Reduce muscle soreness

One study found evidence that foam rolling after exercise may help reduce delayed-onset muscle soreness. When foam rolling for 20 minutes immediately after exercise, in addition to another session 24 to 48 hours after exercise these participants show a decrease in delayed-onset muscle soreness when compared to exercising without foam rolling. They also performed the physical exercises better than those who didn’t foam roll. More research is needed in more diverse groups to understand these benefits further.

3. Improved mobility and enhanced recovery

Although studies are just emerging, research has shown so far that foam rolling can help to increase mobility and range of motion in joints, as well as enhance recovery for improved future workout performance.  In Verywell Fit’s ultimate foam rolling guide they report research which shows this can be achieved in rolling just 3 times per week for three sets lasting 30-50 seconds.

4. It feels great

This is an opportune moment for self-care, priorisiting your wellbeing and time for you to look after your body, health and mind. Many people find foam rolling to be calming and relaxing, reducing tightness which can also help relieve a feeling of tension in your muscles enabling you to feel calmer as a result. Taking the time to stretch and roll ensures you also take time to rest, which can be as beneficial overall for stress levels.

5. It works!

The evidence and data does show that it is a beneficial technique, for example, further studies have shown it has helped to improve speed and flexibility, reduce muscle soreness and maintain performance. However, it is also part of a holistic approach to recovery and performance, it won’t replace a healthy lifestyle and you will still need to eat a balanced diet and get enough sleep to aid recovery.


Foam rollers stretch and massage muscles with our amp wave roller


Types of foam rollers

Foam rollers are generally cylinder-shaped hollow or dense tubes made of dense foam. They come in a range of lengths, sizes and firmness. It helps to take the time to find one which suits your needs and preferences to ensure it is comfortable to use.

Our amp wellbeing textured rollers have ridges and waves on them, which help them to be able to work deeper into the muscles to work out knots and tension. You can find the range here.


How to use your Foam roller

Using your body weight, roll the core muscle groups (quadriceps, hamstrings, glutes and calf muscles) in an effective way to relieve tension in areas which regularly get fatigued and sore.

Release and stretch foam roller - Ampwellbeing


How to foam roll calves

Increase your flexibility, stride length and performance with calf rolling. Sit on the floor with your legs straight out in front of you. Place your foam roller underneath your Achilles and raise your torso up, forming a platform with your hands. Gently use the roller to apply pressure and target tender areas where necessary.


How to foam roll your quads

Lay flat on your stomach and place the foam roller underneath your thighs. Gently bend your legs at the knee and rock backwards and forwards taking care to effectively stretch the muscle.


How to foam roll your back

Lie with the foam roller placed horizontally underneath your shoulders and slowly roll your upper back up and down the roller, pause in areas of tension to focus the pressure. This can be particularly helpful for countering the effect of sitting for long periods at a desk. To enhance movement, extend your arms out in front of you as you move up and down.

Remember: focus on your muscles, avoid joints, bones and never foam roll or apply pressure to your neck.


Release and stretch foam roller - Ampwellbeing


How long does foam rolling take?

A good rule of thumb is to roll a muscle for around one minute. Make sure that as you apply pressure, you stretch the muscle out for maximum results. The bonus is the benefits of foam rolling can be achieved in 5-10 minutes post workout!


The widespread use of foam rollers for sports settings to increase training efficiency is shown to be justified in research.

Foam rolling can help enhance recovery, reduce muscle tenderness and improve performance, with a method that is affordable, easy to perform and time efficient to enhance muscle recovery. If you are serious about improving your health and wellbeing and achieving your fitness plan, adding in effective recovery and stretching techniques will help you reach your goals.


Do you foam roll? Let us know how you get on and your favourite moves!


4 Benefits of Working Out With Resistance Bands - Ampwellbeing

4 Vorteile des Trainings mit Widerstandsbändern

Wenn Sie Ihr Heimtraining etwas intensiver gestalten möchten, sind Widerstandsbänder vielleicht genau das Richtige für Sie. Sie sind eine großartige Möglichkeit, Muskeln aufzubauen und Ihren...
4 Vorteile des Trainings mit Widerstandsbändern Wenn Sie Ihr Heimtraining etwas intensiver gestalten möchten, sind Widerstandsbänder vielleicht genau das Richtige für Sie. Sie sind eine großartige Möglichkeit, Muskeln aufzubauen und Ihren Körper zu straffen, da sie jeder Trainingsbewegung Spannung und Widerstand verleihen.


Sie können Widerstandsbänder auf verschiedene Arten verwenden, indem Sie sie um verschiedene Körperteile wickeln und an verschiedenen Ankerpunkten befestigen, beispielsweise an einem Türrahmen oder einem Bettpfosten. Sie sind außerdem in verschiedenen Widerstandsstärken erhältlich, sodass Sie den Schwierigkeitsgrad Ihres Trainings variieren können. Sie sind für alle Fitnessniveaus geeignet.


Hier erläutern wir einige der wichtigsten Vorteile des Trainings mit Widerstandsbändern und geben einige Beispiele für effektive Übungen, die Sie in Ihr Training einbauen können.

Vorteile der Verwendung von Widerstandsbändern

1 Tragbares

Einer der größten Vorteile von Widerstandsbändern ist ihre Tragbarkeit. Da sie so leicht sind und in einer Tasche nur wenig Platz einnehmen, können Sie sie überallhin mitnehmen, egal ob auf Geschäftsreisen oder in den Urlaub! Das macht sie ideal für Menschen, die ständig unterwegs sind, und bedeutet, dass Sie nie wieder ein Training verpassen müssen.

2 Wirksam beim Aufbau von Muskelmasse und Muskeltonus

Widerstandsbänder sind äußerst effektiv beim Aufbau von Muskelmasse und -tonus, da sie den Bewegungen Spannung und Belastung verleihen, was für den Muskelaufbau erforderlich ist. Anders als bei Gewichten, die während einer ganzen Wiederholung gleich schwer bleiben, erhöht sich die Spannung von Widerstandsbändern, wenn sie auseinandergezogen werden, wodurch die Muskeln härter arbeiten.

Untersuchungen zufolge ist das Training mit Widerstandsbändern beim Muskelaufbau genauso effektiv wie das Training mit herkömmlichen Widerstandstrainingsgeräten wie Kraftmaschinen und Hanteln.

3 Reduziert das Verletzungsrisiko

Widerstandsbänder üben nur eine sehr geringe Kraft auf die Gelenke aus, sodass im Vergleich zum Krafttraining ein geringeres Verletzungsrisiko besteht. Sie können den Widerstand auch erhöhen, ohne das Verletzungsrisiko zu erhöhen. Daher sind Widerstandsbänder eine großartige Option für ältere Menschen oder Personen mit bestehenden Verletzungen oder Gelenkschmerzen.

4 Trainiert mehrere Muskelgruppen

Da Widerstandsbänder so vielseitig sind, können Sie in bestimmten Winkeln trainieren, um bestimmte Muskelgruppen gezielt anzusprechen. So ist es beispielsweise viel einfacher, kleinere Muskelgruppen zu trainieren, die sonst beim Training vernachlässigt werden könnten. Sie können auch mehrere Muskeln gleichzeitig trainieren und so ein Ganzkörpertraining durchführen.

Darüber hinaus erfordert die ständige Spannung eine besonders starke Muskelbeanspruchung und aktiviert stabilisierende Muskelgruppen zur Kontrolle der Bewegung, wodurch Gleichgewicht, Stabilität und Rumpfkraft verbessert werden.

4 Vorteile des Trainings mit Widerstandsbändern

3 Beispiele für Übungen mit Widerstandsbändern


1. Seitheben

Wie es geht:

  • Beginnen Sie, indem Sie mit dem rechten Fuß vor dem linken stehen, flach auf dem Boden, wobei die Mitte eines Widerstandsbandes unter dem Fußgewölbe eingehängt ist. Halten Sie Ihre linke Ferse leicht vom Boden abgehoben.
  • Greifen Sie mit einer Hand ein Ende des Widerstandsbandes, während Ihre Arme an Ihren Seiten hängen.
  • Heben Sie beide Arme nach außen, bis sie parallel zum Boden sind, und kehren Sie langsam in die Ausgangsposition zurück.
  • Wiederholen Sie dies für beide Seiten.


2. Kniebeugen mit Band

Wie es geht:

  • Stellen Sie sich mit hüftbreit auseinander stehenden Füßen auf die Mitte eines Widerstandsbandes.
  • Halten Sie mit jeder Hand ein Ende des Bandes und beugen Sie die Arme, um Ihre Hände an Ihre Ohren zu führen.
  • Halten Sie Ihre Arme in dieser Position, spannen Sie Ihren Rumpf an und senken Sie Ihre Hüften nach hinten in die Hocke.
  • Strecken Sie Ihre Beine, um in die Ausgangsposition zurückzukehren.


3. Seitlicher Plank High Pull

Wie es geht:

  • Beginnen Sie in einer seitlichen Plank-Position mit einem Widerstandsband unter Ihrer Hand auf dem Boden.
  • Greifen Sie mit der anderen Hand das andere Ende des Bandes und beugen Sie Ihren Ellbogen, um es vom Boden wegzuziehen. Achten Sie darauf, in einer stabilen Plank-Position zu bleiben.
  • Auf beiden Seiten wiederholen.


Zusammenfassung

Widerstandsbänder sind eine großartige Möglichkeit, Ihr Training intensiver zu gestalten. Sie sind effektiv beim Muskelaufbau, der Muskelstärkung und der Muskelstraffung und bieten zahlreiche weitere Vorteile, darunter ein geringeres Verletzungsrisiko, Tragbarkeit, Vielseitigkeit und die Möglichkeit, mehrere Muskelgruppen gezielt anzusprechen. Sobald Sie anfangen, sie zu verwenden, werden sie wahrscheinlich zu einem unverzichtbaren Trainingsgerät für Ihr Heimtraining!

AMP bietet Latex-Widerstandsbänder in fünf verschiedenen Stärken an, von extra leicht bis extra schwer, je nachdem, wie anspruchsvoll Sie Ihr Training gestalten möchten.

Oder probieren Sie die verstellbaren Stoffbänder , mit denen Sie die Intensität Ihres Trainings durch Anpassen der Bandlänge variieren können.

Welche Bands magst du lieber? Lass es uns wissen.

Verstellbare Stoff-Widerstandsbänder